Here is our music video.

Here is the outside panel of my digipak album cover.

Here is the inside panel of my digipak album cover.

Here is the inside panel of my digipak album cover.

Here is a link to my artist's website. Please click on the image below to enter the website.

Sunday 26 November 2017

R+P Post 33: Reflections on my role and contribution during research and planning

Overall, I feel very confident about what our group has accomplished during the research and planning period. It's been a pleasure to work with Noa and Emilio in this time, who have both contributed a lot to this project.

Here is what I have contributed during Research and Planning:

Planning the video
  • I contributed some useful ideas for tracks when deciding which song to use for the music video, some of which are now our influences (e.g. Lucy Spraggan)
  • I contributed a lot of shot ideas for both the timeline and the story board, including the idea of Casey grabbing her favourite things when she is sad, which are all reminiscent of the characters in her dream.
  • I helped make the props and set, particularly the apple tree and the light-up lamppost-head. 
Planning the website/album cover
  • I provided some useful examples of websites that may influence our band's (e.g. Lucy Spraggan, Sheppard)
  • I provided some useful examples of album covers that may influence our band's (e.g. Florence and the Machine's 'Lungs')
During test shoot
  • I performed the role of the lead guitarist 
  • I helped source costumes for myself and others (e.g. brown trousers for Ray, who played Shaggy)
  • I helped create lighting set-ups
  • I helped film shots and tested out some successful shot ideas (e.g. the tilt from mirror to Casey to show her transformation into Alice)
Overall, I believe my group and I have contributed a lot to this project. I am very happy with what we have accomplished so far and am excited to continue on to the construction of the project.


R+P Post 32: Test shoot and rough edit

Our test shoot occurred on the Thursday and Friday before our main shoot week. The main purpose of the test shoot was to test our lighting and camera set ups and practice our performances in the main performance area. The test shoot was a really good experience. It was our first chance to get hands on with our kit, and the first time we stood up our shots - before then, our shot ideas existed only on paper, so it was very good to put them on their feet with all our props and scenery.

The test shoot was a big learning curve for me. For instance, before the test shoot, I was very nervous about the prospect of operating the professional kit, particularly the lighting desk, as I had never before had hands on experience with it. With some help from our technician Sam, I got my head around using the kit and before long, I was able to help my group create some of our lighting set ups and record them to the monitor for later use. By the end of the two days, I was perfectly confident using the equipment.

Me using the lighting desk
During the test shoot, I took a few other roles. As a performer, I practiced my guitar playing and tried to come up with a movement bank to service the playfulness and energy of Hugh Tyler. I had a lot of help from my group to keep my energy up and come up with new moves to do.


I also took on the role as performance director. I helped others in my group keep performing in their roles as the band member's and coming up with some movements to help visualise this.

Me and Noa working on movements for band shots

The test shoot helped us realise which of our ideas worked. One of the things we realised worked well was the band shots. We really liked the composition of the band members in the shot, with the centre containing Casey in front and Hugh slightly behind, and Terence and Guy flanking them. This foregrounded Casey as the 'face' of the band and, being next to one another, allowed Casey and Hugh to exchange some playful sibling moments to highlight their brother-sister relationship, which is an important feature of our band.


Furthermore, the test shoot showed us what needed to change. Some of our lighting states, for example, appeared too dark when we reviewed the footage, such as in the Singing' in the Rain set up. This was a problem as our music video aesthetic involves bright colours. We decided to add more white lights to shine on the performers so that they would no longer be so obscured by the dark.


Overall, I am very happy with how the test shoot went. Because our first day of the main shoot was the day after the test shoot, we unfortunately did not have the time to construct a rough edit. However, we found the experience very useful and being able to review the footage gave us a lot to think about into how we could improve. I feel that I have come out of the test shoot confident about starting the main shoot, as I now have the technical knowledge I need to help behind the camera and I feel well rehearsed in my performance.

R+P Post 31: My call sheet

We created our call sheet alongside with our shoot board. We did this because it allowed us to quickly reference the call sheet whenever we studied the shoot board, which we plan on placing on the back wall of the studio. We sat down with Tom and Lily, who agreed to be our make-up artist, to receive their timetables so we knew when they would be free, and adjusted the call sheet accordingly. Copies of the call sheet were then discussed with Tom, Lily and the extras involved in the party sequence we will be filming on the first Saturday, elaborating what time they would need to arrive and what they would be doing.

Here is an excerpt of the call sheet from our shoot board:

The right most column contains the call sheet for our performers - names not in bold denote people who are available but not needed for performing
Creating a call sheet was important as many of the people involved in our shoot do not take A Level Media and so do not have similar timetables to us, therefore we need to keep track on what we could accomplish for each shoot session. This particularly helped with Tom and Lily, who were both vital to the production of the video. We needed to ensure Tom knew when he was needed because his role as a band member means his attendance to the whole band shots, which take up a lot of our shoot time, is essential, and we needed to make sure Lily knew what make-up she would need to bring for each set up.

R+P Post 30: My shoot board

We created a multi-functional shoot board to help us on the week of our shoot. This board will show us what set ups/shots we will be shooting and when, as well as having a list keeping note of all the props and people who will need to be present at the time of each shoot. We plan to have this shoot board on the back wall of the studio so that we can always keep track on what we are filming on each day.

Here is our shoot board:


On our shoot board, we also kept tabs on people who would be free to help out even if they aren't needed on set (their names are not in bold) and includes lots of time near the end of the week for backups in case we want to reshoot any of our shots. Our shoot board was heavily influenced by who was free; for example, we could only do band shots when all four band members were available. This is why we created the shoot board alongside our call sheet.

Creating a shoot board is useful because it will help us to stay organised on the shoot week; we are under strict time restrictions, having only one week in which to shoot, so scheduling what we are going to film will help us make efficient use of our time so that we can progress. Also, by noting what shots will be filmed on each day, we can also remind ourselves if we have missed any shots, for example if we run out of time one day to finish a set up. 

R+P Post 29: Rehearsals

During our test week, we dedicated time in our normal schedule to rehearsing some of the movement and performances that we would be recording the following week for our music video.

Rehearsals allowed us time to prepare our movements and characters, and get us performance ready. This particularly helped with our band shots, as prior to rehearsals, we had never had the full band performing together. We used this time to rehearse how the band member's played off each other, establishing the relationships within the band, most notably that between the siblings Casey and Hugh - me and Noa helped each other develop some moves during the band shots that would show our character's playful, goofy relationship as brother and sister.

Me and Noa working out 'sibling moves' we could do in the band sequences
Furthermore, as the only member of the band not in our group, it was good for Tom to become familiar with the track and practice performing alongside the song with a keyboard.


Another reason why rehearsals were so important was some of our movements involved choreography. For example, the Singing in the Rain set up involves dance moves lifted from Gene Kelly's performance in the original film. As none of us are trained in dance, we needed this rehearsal time to make our performances look serviceable and entertaining. During rehearsals, we created a bank of movements we wanted to pay homage to from the original choreography of the song, using umbrellas and the lamppost as props to interact with. After rehearsals, we felt confident that we could deliver fun and confident choreography.


Finally, rehearsals allowed us to make our music video come out looking very professional. During rehearsals for the Mortal Kombat fight scene between Casey and Guy, we discovered that the fight could potentially look rough and un-choreographed. Therefore, we choreographed the fight with specific moves and stances so that the sequence looked polished.


Friday 24 November 2017

R+P Post 28: My kit list

In preparation for our shoot, we compiled a list of the equipment we would need to create our music video. We are very lucky to have access to so much industrial standard equipment. We are benefitted enormously from having such high quality kit at our disposal. 


We decided against using any floodlights in our music video, despite them being available for our group to use. This was because we didn't need the use of extra white light to shine on the performer's, and we didn't want that white light to wash out the colours on our cyclorama.

Recording Kit: 

Our recording set up involved a tripod, a camera and a monitor, which we could wire to the camera. We will attach the monitor to the mains using an extension box. 

Noa setting up the monitor to frame her shot
Our intentions for using this kit are to use the tripod for the still shots in the music video, most notably the long shots, so we could frame up the shot and leave the camera to record, and then take the camera off of the tripod and detach the monitor when shooting our handheld shots. 

We made use of the Samsung TV to watch our recording on a larger screen. We also had access to a number of different lenses for our camera which we could use depending on what we wanted our shots to look like.

Emilio looking at the TV
✓ The camera is of professional quality, creating vibrant and clear footage that will enable our final music video to look professional standard.

✓ The lenses are quick and easy to switch over; as we only had one week in which we could shoot,  this saved us lots of time.

Me and our media technician Sam changing the sense for the camera
✓ We benefit immensely from the versatility of the equipment; the tripod in particular is highly adjustable, thus lending us lots of high and low angles to shoot from.

✓ The monitor enlarges our screen to make it clearer to see the performers; this will be particularly helpful when we are trying to see if a performer is in focus and if the colours look good.

The monitor made it easier to see how the colours looked on screen
✓ The Samsung TV is useful as by turning it to face the performance space, we can use it to frame up shots, most notably during the band shots when all of us are performing and no-one can operate the camera. We can also use it to show shots to people up in the galley so they can see if it looks right. 

How we used the Samsung TV to frame our band shots
✖ There will be a large number of wires and cables involved in setting up this equipment; for example, the monitor needs three separate cables for it to function the way we want. This makes it incredibly time consuming to set up, and for most of our shoot days, our first twenty/thirty minutes will likely be devoted to setting up this kit, and the same at the end of the day for packing the kit away. This will eat into our one week shoot time considerably

Me setting up the camera before a shoot
✖ The monitor needs to be attached to the mains and, when we want to use the Samsung TV, another wire is needed to link the monitor to the TV. This means a lot of wires are lying on the floor. This is a big trip hazard and we have to be very watchful about not tripping up on the loose cables and tape them to the floor to avoid snagging. 

Lighting:

We took advantage of the multiple studio lights that are rigged to the ceiling of the studio. Each of these lights could be adjusted in multiple ways. Using the lighting rod, we could adjust the angle the light faced and whether it would create a flooded or spotlight effect. 

Me adjusting the lights using the lighting rod
We could also adjust what colour the light was by using the lighting desk and selecting from a variety of lighting set ups. The lighting desk allowed us to select which lights we wanted, which colour we wanted them, and how intense we wanted the light to look. 

Me adjusting the lighting
We could then record that set up and select it from the monitor when we next needed it. 

Me recording our lighting set up on the monitor
✓ The lighting desk is simple to understand, and after being trained by our media technician and trying it out hands on, it is an easy piece of technology to get to grips with it; for example, choosing to change the intensity of one of the lights was as simple as pressing a button to select the light and scrolling a wheel to adjust it's brightness. This ease of use was helpful to me in particular as operating studio technology is one of my weaker skills. 

These scrollers helped adjust the lighting state
✓ The lighting desk also allowed us to create the pastel colours of our music video by selecting a bright colour and paling it out slightly by switching two or more of the lights to white. 

This photo demonstrates how the white light helped make our colours look paler and better fit our pastel colour palette

Sound:

Our studio allowed us to hook up one of our phones to the sound system so that we could play our track through the speakers. This was adjustable down by the performance space as well as up in the galley using the sound desk. We intended to use this so that Noa could sing along with the song and produce a realistic lip sync.

Our sound desk
✓ Using the studio's sound system was useful as by hearing the music at a loud volume, we could always make sure we could keep time when performing with instruments (e.g. hear when specific guitar/drum rhythms occured) and hear the lyrics to produce a convincing lip sync; Noa was exceptional in singing along with the track and the resulting lip sync looked very convincing. 

✓ The sound desk allowed us to raise and lower the volume when someone was in the galley. This meant that we could quieten the room when communicating with each other. It also helped when we wanted to up the energy of performance to be able to up the volume; this was important as our music video demanded lots of energy and enthusiasm for all the performers. 

Wednesday 8 November 2017

R+P Post 27: Casting

We decided it was most beneficial to us to cast all three of us as members of the band in the music video. This way, we would minimise the amount of help we would need from people outside the media department who would have other commitments and would likely be less able to attend as many shoot sessions. Additionally, we have all been a part of the music video remake task as performers, so we have all had experience in performing to camera and in being a part of a professional music video studio shoot.

We tested whether we had made the right decision in casting us three by performing a screen test, where we auditioned Noa's lip synching and Emilio and I's performance skills.

Our Screen Test

We found that after the screen test, we were all very happy with how we had cast the band; the voice of Lisa Muller works convincingly with Noa's lip synching and overall we looked like we gelled well as a band.

With this in mind, we decided to cast the band as follows:

Casey Tyler - Noa Craig 

Description of Casey: Casey is playful, happy and likes to add her own quirks and sense of fun to her performance 

Noa Craig
We cast Noa because she is an experienced performer, having taken part in professional theatre productions such as Emil and the Detectives, as well as performing in concerts as part of the school's Jazz Band and orchestra. She is naturally vivacious and fun loving, much like Casey Tyler, and we believe she can bring energy to Casey's performance and a genuine sense of playfulness. We also thought that she demonstrated great lip syncing skills in the screen test, and that her voice matched that of Lisa Muller's very well.

Hugh Tyler - Jack Edmondson

Description of Hugh: Hugh is a showman, likes to act very energetically and gets very excited playing his guitar

Jack Edmondson
As the second most prominent member of the band, and as Casey's sister, Hugh needs to match Casey's enthusiasm. We cast myself because I have had lots of experience in performing at a big scale as an A-Level Drama student, and as I played the bass in our Echosmith remake for our prelim, I am comfortable performing with and pretending to play the guitar convincingly. 

Terence Kitchener - Tom Brown 

Description of Terence: Although he loves to have fun like the rest of the band, he is considered the most serious, as he likes to show off his keyboard playing skills and act smug when performing, and does not (like the others) tend to poke fun at himself

Tom Brown
We cast ex-AS media student Tom Brown as he is a experienced performer, both in acting, having an extra-curricular interest in drama, and a musician. We auditioned him for the role, in which we set him in front of a keyboard and saw if he could play it convincingly; we decided that he looked very natural playing the instrument, and also very entertaining playing the 'straight man' appearance of Terence.

Guy Chapman - Emilio Francischelli

Description of Guy: He is the quieter member of the band, and in performance plays the drums in the background with enthusiasm


Emilio Francischelli
We cast Emilio because he has had some experience performing in the prelim music video, and as he has a drum kit at home, he has opportunities to practice playing along with the music at home to create a convincing performance as a drummer.

Extras

For our final scene we needed to enlist the help of our friends to dress up and create an effective party set up. We created a long list of people we would ask, intending to shorten to a final cast list of extras when we knew who could attend our Saturday shoot at the studio.

Our Long Casting List - we organised who would ask each person (shown by the initials to the left of the names)
Eventually we shortened our list of extras to 5 people.

Our whole cast in costume

R+P Post 26: Set design, location and props

Location

We decided that the entirety of our music video should be filmed in our school's Seward Studio.

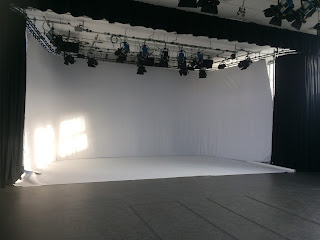
The Seward Studio (dressed)
The set will be dressed with a white cyclorama and white floor, allowing us to flood the performance area with our coloured light with an infinity effect. This will be our backdrop for the action of our video, and on which all the pieces of set will stand.

We wanted to replicate the lighting backdrop in video's such as Jessie J's 'Price Tag', with the broad open monochrome spaces with just one/zero pieces of set 
The performance space covered in light, demonstrating the monochrome effect on the cyclorama
The studio gives us a large performance area and professional standard lighting and sound equipment. This enables us to create a wide variety of lighting states that can be adjusted in intensity and colour, and then recorded as a memory, giving us creative freedom over how we can dress our set ups.

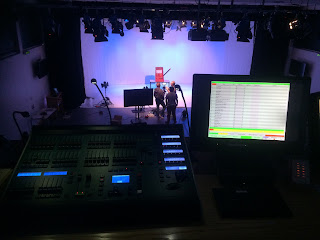
The studio's lighting desk (left: the desk where we could adjust our lights, right: the screen where we could save our lighting set ups for the shoot)
We also have access to the sound system which means we can boom our track out whilst recording, both helping our singer to feel more comfortable in singing along and give a more confident performance, and making sure all our performers on instruments can hear the track to keep time.

Other benefits of recording solely in our school's studio include:
  • we won't need to seek permission to film on location; where we will have to seek permission to book the studio in and out of school hours, the process was made simpler by our connection to the school. 
  • the studio location helps push our band's aesthetic; we agreed that the live performance feel to singing in a studio helped push our band's image as being 'all about the music' and their performance. 
  • the tech in the studio is professional standard, which we are lucky to have access to and helps create some fantastic lighting set ups for the different parts of our narrative. 
Set Design and Props

We decided that all our pieces of set should be homemade.


Inspired by music video's like Sia's 'You've Changed' (above), we decided to use cardboard props and set pieces as we thought the creative streak of having homemade practical effects would successfully demonstrate our band's fun loving and independent image. We achieved this by collecting as much junk modelling material as we could find (e.g. cardboard boxes, toilet rolls, old newspaper) and scheduling times where we would get together to craft or paint these into pieces of set and props in advance of our shoot.

The set we needed to create included:

- a lamppost (for Singing in the Rain)
- a slot machine (for Sergeant Pepper)
- an apple tree (for Alice in Wonderland)

The props we needed to create included:

- a 'K.O' and 'Fight!' sign (for Mortal Kombat)
- two power-meters/ health bars (for Mortal Kombat)

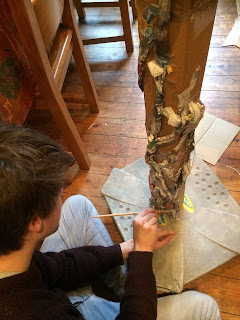
Here, Noa and I are creating the lamppost at my house
One example of how we made one of our set pieces is the apple tree; we created this by taping long cardboard cuboids together, then using PVA glue and old newspaper to papier-mâché the grooves of a tree trunk.
We stood the trunk of the tree on an old Swingball set I owned to keep it upright
We then painted the trunk brown, cut out the outline of a bushy tree top (painted green) and apples (covered in red and green glitter) from cardboard. 

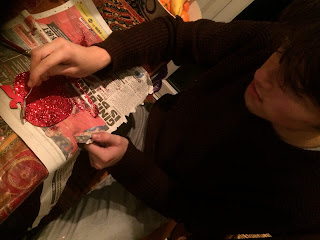
We coated the apples in red glitter to make them look fantastical for the Alice in Wonderland set up
Finally we stuck the top of the tree onto the trunk to create the final result.

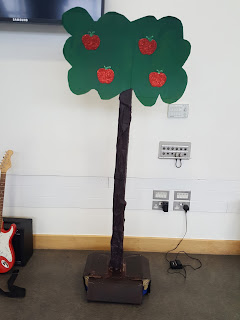
The finished apple tree
This approach to set design benefitted, not only our low-fi band aesthetic, but also helped lower our expenditure as we had to purchase very little to have all our props and set.

Tuesday 7 November 2017

R+P Post 25: Costumes, props and make-up

Costume

We solidified the costumes we would need for the shoot after finalising the aesthetic of our music video and band, as well as the media inspired set-ups that would affect the costumes of the performer:

Aesthetic of music video - pastel, bright, fun, playful
Aesthetic of the band - fun, playful, enthusiastic, energised
Media set-ups - Singing in the Rain, (Beatles) Sergeant Pepper, Alice in Wonderland, Mortal Kombat

After we decided on this, we could pin down the costumes for each band member on a costume list:

Our Costume List
We broke our costume list down by band member. We agreed that each member of the band should each have 'band clothes' that fit the band/track's aesthetic (e.g. pastel colours), and a separate themed costume for their characters in Casey's dream (e.g. a Sergeant Pepper outfit, a three piece suit for the man from Singin' in the Rain etc.).

We found inspirations for what we wanted for our band's costumes:


These clothes worn by the band Echosmith channel the pastel aesthetic we would like for our band, such as Sydney's light pink shirt and Graham's light blue jacket. We also liked the look of the bright tops above dark skinny jeans, as this brought the viewers eyes up to where their faces are. Therefore we decided that all the members of the band should where black skinny jeans and a different pastel coloured top.

As for the themed costumes, we decided to find/design clothes that fitted the costumes of the original characters as closely as possible. For my character, this involved finding a dark blazer, waistcoat and trousers, a grey hat, black shoes and a red tie.

Our visual references for themed costumes
Left to Right: Don Lockwood (Singing in the Rain on Broadway), one member of Sergeant Peppers Lonely Heart Club (The Beatles), Alice (Disney's Alice in Wonderland), Scorpion (Mortal Kombat)

Here are our band's final costumes:


We got positive feedback from our target audience on our band's costumes. One piece of feedback told us that 'the costumes make the band look like they belong together', which is what we wanted to achieve.

As for the costumes for our extras, we allowed them to pick fun and/or iconic pop culture icons to act as and source their own costumes. They sent us pics of their costume prior to the shoot for us to approve. This meant we could check that the costume would meet the aesthetic of our video, both in colour and in the nature of the character; super violent characters, for example, would not fit our fun, fluffy video.

Our extras in costume

Props

We compiled our needed props on a prop list:

Our prop list
We broke our prop list down by set-up. After pinning down what props we would need we allocated who should get each prop. For instance, I was allocated to bring in the white toy rabbit and the red umbrella. We also created a separate list (seen in the box on page 2) of props that needed making. All of the crafted props needed to be made by cardboard to suit our low-fi aesthetic for our music video, so we first drew them out to establish how they would look and work.

Our design page for props
Above, we designed the look of the 'FIGHT' signs...


... as well as the components that would need to go into making the power-o-metre sliders, which would need to be operated manually; the design process helped us work out how to pull the green slider over the red backdrop to give the impression of a video game health bar,


Make-up:

We recruited the help of our good friend Lily Mo Browne to be our make-up artist. She is very experienced with make-up, produces great results in a short amount of time and we knew that she would be perfect for the job.

Our make-up artist Lily Mo Browne
Although our group decided on minimal make-up, we did discuss reference points to give to our make up artist so that they knew what look we wanted for our band members make up.

We decided for the makeup for Terence and Guy, as the most standoffish of the band, should have minimal makeup of foundation and concealer.

We decided foundation would make the performers look more aesthetically pleasing under the lights of the studio.
For Casey in her band attire, we decided that she should wear some additional make-up, including: 
  • eyeliner
  • glitter
  • contour
  • lip gloss
Casey Make-Up References
Lily Allen was one of our influences for Casey's image, and this make-up is perfect for the type we would like in our video
For Hugh, the most outgoing of the male members of the band, we wanted to try giving him black eye shadow. As part of a liberal family, we decided it was fitting for him to be unafraid of wearing makeup and disturb gender norms. 

The Killers' Brandon Flowers was debatably the original pop icon to wear eyeliner - we wanted to replicate this look for Hugh Tyler

R+P Post 24: Planning my digipak panels

Just like how we planned our webpage, we decided to each draw a plan for a potential album cover for our artist, and then compare.

Here are our designs:

OUTSIDE COVER


INSIDE COVER


After sharing our designs, we decided on the features of the album cover we wanted to add, which were:

  • A thin border around the front and back panel
  • Including every member of the band on the front cover. As an obscure artist, it is important to sell the appearance of each of the band members on the front of their debut album so that the audience can associate their image with their music.  
  • Having Casey Tyler as the prominent image on the front cover, highlighting her as the lead singer and the figurehead, or 'face', of the band/ 
  • A colourful background, and a hand drawn band logo, similar to the colourful, handmade aesthetic of the website and the music video - this makes for a stronger promotional package as all parts work in synergy.
  • Using location promo shots in the inside cover, pairing the studio image on the front with a rougher image on the inside that showcases the band as a group of friends. This is because we want to push the saleability of the band through glossy, studio promo shots on the cover, so that more people will buy the album, then change the audience's experience when opening the album to make them feel that they are now closer to the friendly and 'real' group of artists.